Thekua has never had a written recipe.
It lived in hands, in the way a homemaker’s palms knew exactly how firm the dough should feel, in the colour the ghee turned when the temperature was right, in the sound a piece made when it was ready to come out. You learned by watching. You got it wrong until your hands remembered.
At The Thekua Company, our homemakers have been making thekua in Mithila for decades. What follows is their recipe — not adapted for a food blog, not simplified for convenience. The authentic Mithila method, with the ratios, techniques, and details that no other recipe documents.
Including one that almost no recipe mentions at all: dried grated coconut. In Mithila’s version, a measured quantity goes into the dough, not for coconut flavour, but for texture. It creates a subtle crunch that runs through every bite and is one of the clearest markers of a Mithila kitchen thekua versus a generic one.
What Is Thekua? (And Why Most Recipes Get It Wrong)
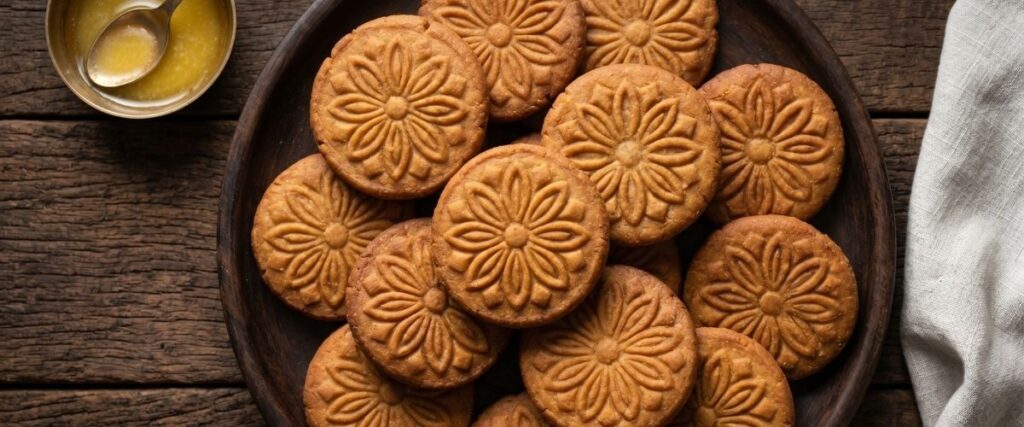
Thekua is a traditional fried sweet from the Mithila region of northern Bihar and southern Nepal. It is made from three core ingredients: whole wheat flour (chakki atta), jaggery (gur), and pure desi ghee, pressed into a patterned mould called a sancha and fried slowly until deep golden brown.
It is not a Chhath sweet that can also be eaten otherwise. It is an everyday food, the snack in the steel dabba, the 4 PM chai companion, that happens to also be made at Chhath. The festival association came later. The everyday tradition came first.
Where most recipes go wrong: Most thekua recipes online make two fundamental errors.
The first is using powdered jaggery instead of block jaggery dissolved into syrup. Powder is inconsistent in moisture content. It clumps unevenly in the flour and makes the dough’s behaviour unpredictable. The syrup method, standard in every Mithila kitchen, gives you control over dough consistency and produces even sweetness distribution throughout.
The second error is frying on a medium flame. Jaggery caramelises significantly faster than refined sugar. A medium flame burns the outside before the centre sets, producing dark exteriors and raw, doughy interiors. The authentic method uses a low flame and 12–15 minutes of patience. The result is thekua that is evenly golden all the way through.
Thekua Recipe: Ingredients
Yield: approximately 20–25 pieces
Prep time: 30 minutes
Cook time: 45–60 minutes (across batches)
Total time: approximately 90 minutes
Cuisine: Mithila, Bihar, India
These are the approximate ratios used in The Thekua Company’s kitchen, sourced directly from our homemakers. Scale proportionally for smaller batches.
For the dough:
1 kg chakki atta (stone-ground whole wheat flour): Not packaged “whole wheat atta” that blends whole and refined flour. Chakki atta specifically, stone-ground, with the bran intact. The coarser grind absorbs jaggery syrup differently from roller-milled flour and produces thekua’s characteristic firm, roasted texture.
500 g block jaggery (gur): Block form, not powder. You will dissolve this into syrup before using. This is a 1:2 ratio — jaggery to atta by weight, which is the Mithila standard. Enough sweetness without the dough becoming soft. Source clean, additive-free jaggery; adulterated jaggery with artificial colour or whiteners produces a bitter aftertaste in the finished thekua.
50–60 g desi ghee (for the dough): Pure desi ghee, not vanaspati or blended fat. This is a precise quantity, enough to coat the flour proteins and create thekua’s short, crisp texture. Too much and the thekua won’t hold its shape; too little and it will be dry and prone to cracking during shaping.
50–60 g dried grated coconut (sukha nariyal): Properly dried coconut, not fresh, not sweetened desiccated coconut. It should be dry to the touch with no residual moisture. This ingredient is specific to the Mithila method and is what gives the texture a subtle crunch distinct from other regional versions of thekua.
Water — approximately 4–6 tbsp, added gradually: You may need less or none at all, depending on the moisture in your jaggery syrup. Add only if the dough won’t come together without it.
For frying:
Desi ghee — sufficient to submerge the thekua pieces: Do not substitute with oil. Thekua fried in oil is not authentic thekua. The aroma, the flavour, and the specific texture that come from ghee frying are not replicable with a substitute.
How to Make Thekua: Step-by-Step Method
Step 1: Make the jaggery syrup
Break the jaggery block into rough pieces. Place in a small, heavy-bottomed pan with 4–5 tbsp water. Heat on a low flame, stirring continuously until completely dissolved. Do not bring to a boil; you want a warm, pourable syrup, not a reduction or a set caramel.
Strain through a fine mesh strainer to remove grit, husk particles, or impurities. Unfiltered jaggery from some sources contains sand or small debris that affects both texture and taste.
Set aside. Allow to cool to room temperature before adding to the flour. Hot syrup added directly to flour partially cooks it on contact, producing uneven, sticky patches in the dough that are impossible to correct.
Step 2: Build the dough
In a wide, flat-bottomed bowl, combine the chakki atta and dried grated coconut. Mix briefly so the coconut is distributed evenly through the flour before any liquid is added.
Add the ghee. Using your fingertips, rub it thoroughly into the flour until the mixture resembles coarse, uneven crumbs, the same technique as making shortcrust pastry. Every part of the flour should have some contact with the ghee. This step is not optional: fat coating the flour proteins before liquid is added is what produces thekua’s characteristic short, crisp texture rather than a bread-like chew.
Add the cooled jaggery syrup gradually, not all at once, mixing with your hands as you go. The dough will come together quickly. Add water only if it will not form a cohesive mass without it, and only one tablespoon at a time.
The dough is ready when:
- It holds its shape cleanly when pressed firmly in the palm
- There are no sticky patches
- The edges do not crack when pressed
- It feels like firm modelling clay, significantly stiffer than chapati dough
If the dough feels comfortable and pliable, it is too soft. A soft dough absorbs excessive ghee during frying and will not hold the sancha pattern.
Step 3: Rest the dough
Cover with a clean cloth and leave for 10–15 minutes. This resting period allows the chakki atta to fully absorb the jaggery syrup; the dough will feel slightly firmer after resting, which is correct, and allows the gluten to relax, making shaping cleaner and easier.
Step 4: Shape
Pinch off a portion of dough, approximately 40–45 grams per piece, roughly the size of a large walnut. Each piece should be consistent in weight; inconsistent pieces fry unevenly in the same batch.
Using a sancha (thekua mould): Press the dough firmly into the mould using the heel of your palm — not your fingertips, which do not apply even pressure across the surface. Tap the edge of the mould sharply against your work surface to release the thekua. The pattern should be clean and fully defined. If the dough sticks to the mould or the pattern is unclear, the dough is too soft.
Without a sancha: Roll the dough into a ball. Press flat with your palm to approximately 1 cm thickness. Press fork tines across the surface in two perpendicular directions to create a crosshatch pattern. The patterning is not purely decorative — it increases surface area and contributes to even frying.
Critical: maintain a consistent thickness of approximately 1 cm across every piece. Thin edges burn before thick centres set. This single variable causes more failed batches than any other.
For more on the sancha — its history, its connection to Madhubani art, and how to use and care for one → read here.
Step 5: Fry
Add sufficient desi ghee to a heavy-bottomed kadai, enough to fully submerge the thekua pieces. Heat on low-medium flame. Allow the ghee to heat through completely before testing.
Temperature test: Drop a small pinch of raw dough into the ghee. It should sink slightly, pause for 2–3 seconds, then rise slowly to the surface and begin to bubble gently and steadily around the edges. If it rises to the surface immediately with vigorous bubbling, the ghee is too hot. If it sinks and stays on the bottom without rising, the ghee is not ready.
Once the correct temperature is confirmed, reduce to a low flame before adding the thekua.
Add pieces in batches without crowding the kadai. Crowding drops the ghee temperature, which causes the thekua to absorb ghee rather than fry in it.
Fry on a low flame for 12–15 minutes, turning occasionally. You are looking for an even, deep golden brown — the colour of good jaggery itself. The surface should look dry and matte, not glistening or wet.
Do not rush this step. This is where most home attempts fail. The low flame is not a suggestion — it is the method. Jaggery darkens and burns significantly faster than sugar. A medium or high flame produces dark exteriors and raw, undercooked centres in every batch.
Step 6: Drain and cool
Remove from the ghee with a slotted spoon. Place on a wire rack to cool. If a wire rack is unavailable, spread newspaper and rest the thekua on that, not on paper towels or kitchen tissue, which trap steam underneath and soften the base.
Do not assess the texture while hot. Thekua firms up dramatically as it cools; what feels slightly yielding at frying temperature will be properly crisp at room temperature. Allow a minimum of 30–40 minutes of cooling before tasting or storing.
Storage and Shelf Life
Once fully cooled, store in an airtight container at room temperature. Keep away from moisture and direct sunlight.
Shelf life: 30 days when stored correctly and the container is kept sealed between uses.
The combination of low moisture content in the dough, ghee (which acts as a natural oxygen barrier), and the frying process — which drives residual moisture out of the dough, creates conditions that prevent microbial growth without any preservatives. This is not a health claim; it is basic food science. Traditional Indian fried sweets made with the right ingredients and technique have always had extended shelf lives for this reason.
What causes early softening: Moisture is the enemy. Wet hands entering the jar, high ambient humidity, or a container that does not seal properly will soften thekua within days. Once soft, thekua does not recover its crunch.
What causes early hardening beyond the normal crunch: Overfrying, or insufficient ghee in the dough. If your thekua is unpleasantly hard rather than crisply firm, reduce frying time by 2–3 minutes and verify the ghee ratio in your next batch.
Troubleshooting: Why Your Thekua Didn’t Turn Out Right
This is the section that separates a recipe written by someone who has made thekua hundreds of times from one that was written by someone who made it once. These are the actual failure modes — and what causes them.
| Problem | Most Likely Cause | Fix |
|---|---|---|
| Soft after cooling | Dough too soft; underfrying | Low-quality or adulterated jaggery or syrup overheated |
| Absorbing excessive ghee | Dough must pass the firm-palm test before shaping; fry for a full 12–15 minutes | Firm dough; use the temperature test before adding pieces |
| Dark outside, raw or doughy inside | Flame too high | Low flame only; jaggery burns fast at medium-high heat |
| Cracks when shaping | Dough too dry | Add jaggery syrup gradually; if needed, one tablespoon of water at a time |
| Sancha pattern not holding | Dough too soft | Reduce water; rest the dough longer before shaping |
| Bitter aftertaste | Dough too soft, or ghee too hot | Source clean block jaggery; do not boil the syrup |
| Uneven frying within a batch | Inconsistent piece thickness | Weigh pieces (40–45g each); maintain 1cm thickness across all pieces |
| Coconut is visible at the surface burning | Coconut not mixed evenly; flame too high | Low-quality or adulterated jaggery, or syrup overheated |
Don’t Want to Make It? We Already Have.
The recipe and ratios above are exactly what our homemakers in Mithila use for every batch at The Thekua Company, the same chakki atta, the same block jaggery dissolved into syrup, the same measured dried coconut, the same low-flame ghee frying that takes patience but produces the real thing.
The only difference is that they have been making this for decades. The dough consistency, the temperature read, the moment to pull the thekua from the ghee, that knowledge is in their hands. Every batch is made fresh after your order. No pre-made stock. No factory production.
Try the 250g Everyday Pack — the right size for a first order →
The 500g Family Pack — most buyers move here on their second order →
Frequently Asked Questions
-
Authentic thekua from Mithila is made with chakki atta, block jaggery (dissolved into syrup before use), desi ghee, and dried grated coconut. It is fried in pure ghee on a low flame for 12–15 minutes until deep golden brown. No preservatives, no refined flour, no oil substitutes.
-
Not for authentic results. Jaggery powder is inconsistent in moisture content and does not distribute evenly through the flour. Block jaggery dissolved into a syrup gives you consistent dough behaviour and even sweetness distribution. The syrup method is standard in every Mithila kitchen.
-
Two causes: dough too soft before frying, or insufficient frying time. The dough must feel firm, like stiff clay, before shaping. Fry on a low flame for the full 12–15 minutes. Do not judge texture while hot; thekua firms significantly as it cools.
-
Not for authentic Mithila thekua. The aroma, flavour, and specific texture of ghee-fried thekua are not replicable with cooking oil. Some recipe adaptations use oil; the authentic method does not.
-
Properly made and stored in an airtight container at room temperature, homemade thekua lasts 60-75 days. The key variables are: low moisture in the dough, correct frying (driving out internal moisture), pure ghee, and an airtight container kept away from humidity.
-
A sancha is a hand-carved wooden mould used to press thekua into a patterned disc shape. Traditional sancha designs carry geometric and floral motifs that share their visual vocabulary with Madhubani painting. Beyond aesthetics, the sancha standardises thicknessm, critical for even frying.
-
Thekua is made during Chhath Puja, yes, but it is not exclusively a Chhath food. In Mithila's kitchens, it was historically an everyday snack: the thing in the steel dabba, the 4 PM chai companion. Chhath is one of several occasions it is made; everyday snacking is the original context.

About the author
Geeta Singh
Co-Founder, The Thekua Company & Mithila House